
Getting extra reps shouldn't depend on whether the school gym is free. A well-planned backyard volleyball setup gives players a place to train on their own schedule, without waiting for open gym hours or fighting for net space with three other teams. Whether you're a parent supporting a youth player or an athlete who wants more touches outside of practice, converting even a modest patch of yard into a real training space is more achievable than most people assume — and it pays off fast in skill development.
This guide walks through exactly how to do it: picking the right space, setting up a net that won't fall apart after a week, and structuring practice sessions that actually move the needle.
The Problem: Court Access Is the Biggest Bottleneck in Player Development
Ask any club coach what limits player improvement most, and "lack of reps" usually tops the list — not lack of talent or effort. Gym time is scarce and expensive. School courts are locked outside of practice hours. Club facilities run on tight scheduling blocks that leave little room for extra individual work. For a lot of players, the gap between "wants to improve" and "has somewhere to practice" is the single biggest obstacle in their development.
This especially hurts two groups: younger players who are still building fundamentals and need high-repetition work, and players in the off-season who lose months of touches simply because there's no organized practice running. Skills like serving, passing platform, and footwork are perishable — they erode quickly without regular reinforcement, and by the time the next season starts, players are relearning instead of building.
The fix isn't more team practice time (that's largely out of a player's control). It's creating a reliable space where reps can happen on a player's own schedule, even if it's just 20–30 minutes a few times a week.
The Solution: Build a Functional Practice Space, Not a Perfect One
You don't need a regulation court to get real value out of backyard training. You need three things: enough flat space to move and hit safely, a net or target system you can set up and break down quickly, and a short list of drills suited to the space you actually have.
Start with space assessment. Look for the flattest, most open area available — a backyard, driveway, or even a large patch of side yard works. You're aiming for at least 15x15 feet of clear space for solo serving and passing work; if you have room for 30x30 feet or more, you can run approach and attack drills as well. Check for overhead obstructions (low branches, gutters) and underfoot hazards (sprinkler heads, uneven ground) before you start setting anything up.
Pick a surface that's forgiving on the body. Grass is the most common option and is gentle on joints, but it slows ball roll and can affect footing when wet. Concrete or pavement gives truer ball bounce for passing and setting work but is harder on the knees and ankles during repetitive jump training. If you have access to both, rotate based on what skill you're working — grass for serving and conditioning, hard surface for ball-control reps.
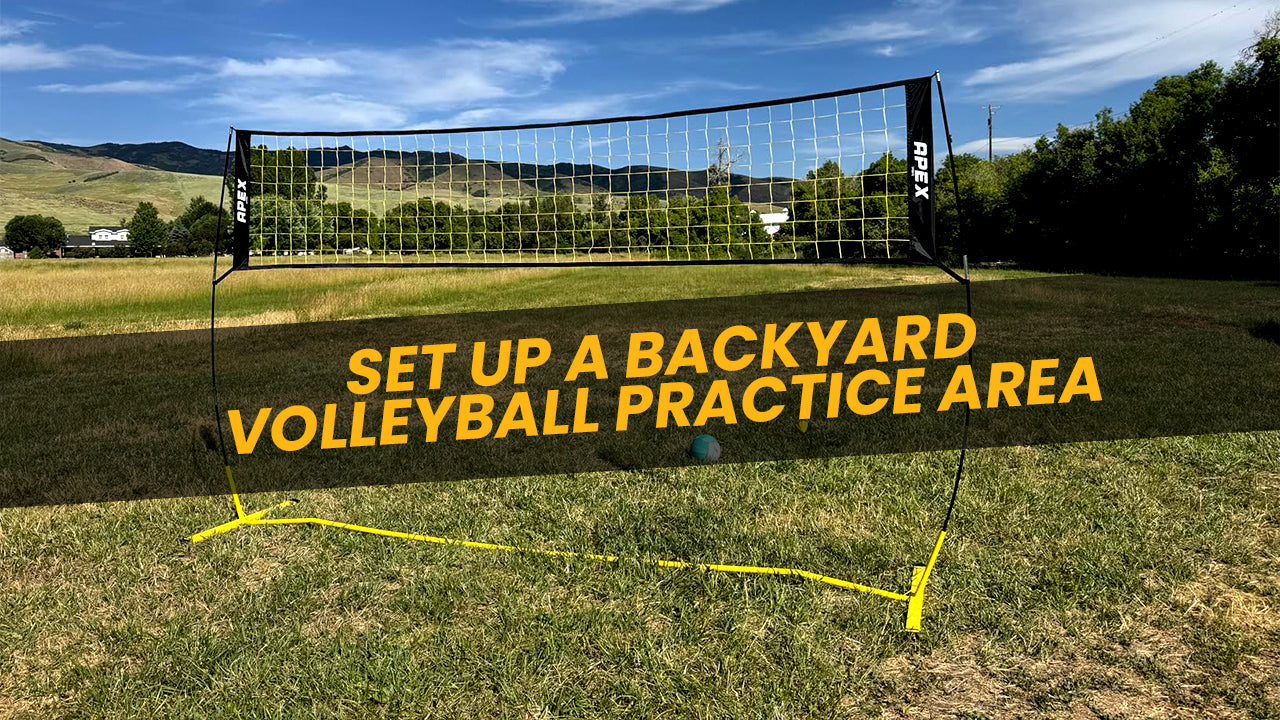
Plan for setup speed. The single biggest reason backyard practice setups get abandoned after a month is friction — if it takes 20 minutes to set up and tear down a net every session, players stop bothering. A portable volleyball net system that adjusts to different heights and folds down quickly removes that excuse and turns "I'll practice later" into "I'm out here in five minutes."
Build in a target system. Serving and attacking drills are far more effective with a visual target — tape lines, cones, or hula hoops placed in serve-receive zones give immediate feedback on accuracy instead of vague "did that feel good" assessments.
Practice Plan: From Empty Yard to Working Training Space
Follow these steps to go from a blank patch of yard to a functioning practice setup in one weekend.
Step 1 — Measure and clear your space. Walk the area you're considering and clear debris, rocks, and any low-hanging branches. Mark the boundaries with cones or spray chalk so players have a consistent sense of in-bounds space during drills.
Step 2 — Install your net system. Set up a portable volleyball net at the regulation or age-appropriate height for the player using the space. Most adjustable systems let you raise the net as players get older or as their vertical improves, so you won't outgrow it in a season. Anchor it securely — sandbags or ground stakes on both base supports — so a few solid serves won't tip it over mid-session.
Step 3 — Mark your target zones. Use tape or chalk to lay out a 6-zone serve-receive grid on the far side of the net. This turns "serve the ball over" into "serve to zone 5," which is a much more useful training stimulus.
Step 4 — Build a weekly rotation. A sustainable backyard volleyball setup gets used 3–4 times a week for 20–30 minutes per session. A simple rotation looks like:
- Monday: Serving accuracy (15 min) + passing platform work (15 min)
- Wednesday: Approach footwork and arm swing mechanics (20 min)
- Friday: Full combo session — serve, pass, set, attack progression (30 min)
- Weekend (optional): Conditioning circuit incorporating jump training and lateral movement
Step 5 — Track progress. Keep a simple log of serve accuracy (out of 10 attempts) and passing target hits each session. Players who can see week-over-week improvement stay motivated to keep showing up to their own backyard sessions — this matters as much as the physical reps themselves.
Equipment Recommendations
The right equipment is what separates a backyard volleyball setup that gets used for one weekend from one that becomes a real part of a player's training routine for years. Here's what to prioritize.
A reliable net system. This is the foundation of the whole setup. An adjustable volleyball net that's quick to assemble and breaks down for storage makes the difference between a space that gets used regularly and one that becomes a hassle. Look for adjustable height settings so the same net works for a 10-year-old now and a varsity player later.
For families or programs that want a more complete setup with boundary lines and a sturdier frame, a full volleyball training system gives you a more permanent feel without requiring an actual court — it's the closest thing to a regulation practice environment you can fit in a yard.
A training ball that matches game conditions. Practicing serves and passing with a ball that doesn't match game weight or pressure builds habits that don't transfer. Use an official size 5 volleyball so the touch and feel a player develops at home is the same touch and feel they'll rely on during a match. Having 2–3 training-quality balls on hand also cuts down on retrieval time, which means more reps per session.
Optional: a rebounder for solo days. On days when no one else is around to feed balls or shag serves, a volleyball rebounder lets a player keep working passing and hitting reps without a partner. It's a useful addition once the core net setup is in place and a player wants to extend solo practice time.
None of this equipment needs to be expensive or elaborate. The goal is removing friction — making it as easy as possible for a player to walk outside and start working, rather than spending more time setting up than practicing.
Conclusion
A backyard volleyball setup isn't about replicating a full gym — it's about removing the access barrier that keeps so many players from getting the reps they actually need to improve. With a clear, level space, a dependable net system, a ball that matches game feel, and a simple weekly rotation, players can turn unused yard space into one of the most valuable training assets they have. Consistent practice with the right drills and training equipment can help players accelerate development throughout the season.
Leave a comment
This site is protected by hCaptcha and the hCaptcha Privacy Policy and Terms of Service apply.